Birthday cake will make you JUMP, JUMP!

I haven't posted since May! I'm a terrible blogger. And I have done a few projects that were post-worthy (a small, two-tiered wedding cake, for example). But I've been doing a poor job documenting my projects because I really haven't been trying new things. Until this week!!!!
One of my very good friends who happens to be a photographer has a son that is turning one. While she was in the hospital, a friend brought her a birthday cake with a "0" candle on top. So cute! So for each month of her sweet son's first year, she faithfully made a cake and took photos of him documenting his growth. (I have a feeling grandparents will be getting the most adorable calendar for Christmas this year!)
So, of course, as we come up on him being a FULL YEAR old, she wanted to do something a little extra special to celebrate not just her son's birth, but to thank all the people that have supported her and her little one as they navigated the first year of being a family of three. She asked me to make a round cake and said she didn't really want a theme and basically gave me full creative license.
After looking around Pinterest, I blended a couple of ideas, and a concept was born! Since it was themeless, I wanted to stick to bright, primary colors, which I thought were appropriate for a little boy and would make a fun cake.
I saw this picture on Pinterest, and loved the idea of making the cake layers different colors.

And then I remembered seeing a tutorial on petal frosting, and though that would be a really cool icing effect since it used all buttercream frosting and didn't involve fondant at all (which I have a love/hate relationship with!)
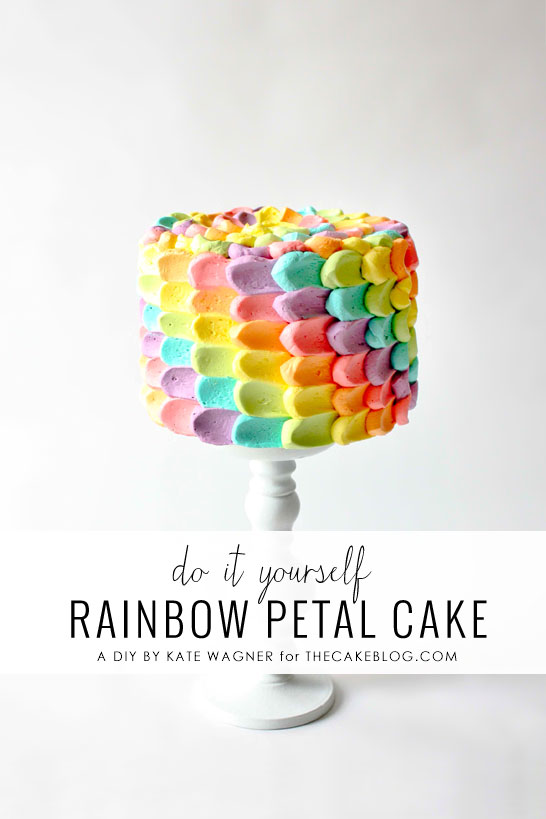
So, substitute the pastel colors for the primary colors, and an idea was born! An idea that turned out really well, but that tempted me to cry more than once during the process! :)
First of all, since I wanted to color the actual cake layers, I needed to use a lighter colored cake flavor. This was a celebration, so I started out with my favorite "celebration" flavor - vanilla almond. I used both the cake and frosting recipes. Only differences were that I subbed in a cup of Crisco for butter just to make the frosting a little more durable, and then I used vanilla extract instead of the vanilla bean. I would tell you how much, but I honestly just poured some in. Probably about a tablespoon if I was a guessing kind of woman. This is a recipe for cupcakes, but what I love about it is that it's basically a double recipe, so you're mixing up two cakes at one time.
I divided the batter into four equal parts (it ended up being about 3 1/4 cups each) and added the food coloring to each layer. For the record, I added a LOT of red and blue food coloring, and still wasn't sure it would be the color I wanted when I baked the layers.

I used a 10" pan to bake the cake layers. Unfortunately for me, I thought I had two pans, but I really had one. I think I ended up baking each layer for about 32 minutes and then waited half an hour for it to cool to remove it from the pan. And then I had to clean the pan out and put the other layer in. But goshdarnit, After four hours of this, I got four beautiful layers!


So I stuck that sucker in the fridge to get the frosting nice and hard and cool, and then I made another round of frosting. After probably 30 minutes, I had the icing made, divided, colored, and into the piping bags. All I did was cut off the tips of the piping bags for this - I didn't use tips for this particular project.


Not bad for a first time, right? I mean, it's definitely not perfect, but the overall effect is really cool, and I'm overall happy with the results!
The only thing that was left was to make some kind of topper to go on top. At first I was going to make white blocks that spelled out "Jump" (A's special nickname), but after seeing the cake, I thought I needed to come up with something else.
Flash back to one of my favorite decorating techniques, which is using candy melts to make personalized decorations for cakes/cupcakes. So I wrote out JUMP on a piece of paper and then put that under a piece of wax paper. This was mostly just to make sure the size of the letters was fairly even.

Then I followed the directions to melt the chocolate and quickly put it into a piping bag with a number 3 tip. I loosely followed the guide I made and wrote out jump on the wax paper. This is a really fun technique and you can do a ton with it, but you do have to work fast when working with the candy melts. They harden fairly quickly! For more ideas, visit the Bird on a Cake blog for more fun ideas of how to use melted chocolate for fun decorating ideas! (And also, I don't know why this picture is sideways, but it doesn't seem to want to rotate, so I'm just going with it!)

Then, to make it colorful to go with the cake, I just dumped a ton of sprinkles on top to make sure the letters were well-covered.


Finally, A's big day came and we got to put everything together for the photo shoot. I wasn't there when the toppers went on, but I showed up to the party and I just loved how everything pulled together!

I didn't get a picture of the inside of the cake after it was cut, but thankfully A's mom is a photographer and it's well-documented. I'll add more of the professional quality photos once she has a chance to go through them.
Overall, I would try this kind of technique again. I would definitely do it on a smaller cake, though - 8" or less. And I would also use an offset spatula to draw out the frosting instead of the back of the spoon. Also, if you want to try this for a first time, I would stick to just using one color on the first attempt. It's not a hard process, but the time increased significantly because I was constantly changing out piping bags and spoons. Keep in mind that even though this was my first time doing this type of technique, I am pretty well-versed at using buttercream in other ways, so I would say my skill level is probably intermediate (at least in novice terms). I would like to work on getting the petals a little smoother, though, so I'll have to find other opportunities to practice!
What do you think? Ready to try this yourself??? :)
First of all, since I wanted to color the actual cake layers, I needed to use a lighter colored cake flavor. This was a celebration, so I started out with my favorite "celebration" flavor - vanilla almond. I used both the cake and frosting recipes. Only differences were that I subbed in a cup of Crisco for butter just to make the frosting a little more durable, and then I used vanilla extract instead of the vanilla bean. I would tell you how much, but I honestly just poured some in. Probably about a tablespoon if I was a guessing kind of woman. This is a recipe for cupcakes, but what I love about it is that it's basically a double recipe, so you're mixing up two cakes at one time.
I divided the batter into four equal parts (it ended up being about 3 1/4 cups each) and added the food coloring to each layer. For the record, I added a LOT of red and blue food coloring, and still wasn't sure it would be the color I wanted when I baked the layers.

I used a 10" pan to bake the cake layers. Unfortunately for me, I thought I had two pans, but I really had one. I think I ended up baking each layer for about 32 minutes and then waited half an hour for it to cool to remove it from the pan. And then I had to clean the pan out and put the other layer in. But goshdarnit, After four hours of this, I got four beautiful layers!

I was really pleased that none of the layers broke while taking them out of the pan. The secret of that success is to do a really good job greasing the pan with Crisco and then covering with flour. Don't skip that part! I was also happy with the vibrancy of the colors after they baked - particularly the red! After they had cooled to room temperature, I used a bread knife to even off the tops just a little, and then put each layer on a 10" cake circle, wrapped them up really good with cling wrap, and put in the freezer because working with frozen cake is much less crumbly than working with room temperature cake.
They were actually in my freezer for a couple days, but eventually I got around to frosting them! The first step was to get the layers stacked with the frosting in between. It's okay if individual layers are a little crooked, but you do want to try to make sure that at the end of the stacking process, the top layer is level. To help with that, I always turn the top layer upside down, so the flattest side is on top.

Then you get to crumb coat the whole outside of it, making sure to get frosting in all those crevices so you have a smooth surface to decorate on. Full disclosure - this isn't a true crumb coat. It's really just a thin layer of butter cream. Since I was doing a buttercream design on the outside, I didn't have a strong desire to get the crumb coat really, really smooth. Also full disclosure - I went through all the frosting I made (which is for a DOUBLE RECIPE of cupcakes) just on this part!

So I stuck that sucker in the fridge to get the frosting nice and hard and cool, and then I made another round of frosting. After probably 30 minutes, I had the icing made, divided, colored, and into the piping bags. All I did was cut off the tips of the piping bags for this - I didn't use tips for this particular project.

And then I started piping! I followed the directions from the Rainbow Petal Cake that I got the inspiration from. They said it was easy and that I could do it myself! I piped a vertical row of dots, alternating the colors from blue to green to red to yellow. I was constantly putting down one piping bag and picking up another. And then when I finished ONE vertical row, I used the back of a spoon (each color had a different spoon) to pull the frosting dot out. Then I would do it again, this time starting with green, then red, then yellow, then blue (to get the cool diagonal look), and so on. Easy right?
Except for a few things! First of all, I'm pretty sure that they were working with a much smaller cake than I was. Do you know how big 10" is??? I got about a fourth of the way through and almost quit. The second thing is that the back of a spoon works just because you have one already, but the spoon width varies, and it's really not as narrow as the icing dot that you're trying to pull. If I ever do this again, I will use offset spatulas instead.

Two other challenges occurred. The cake spinner thingy (I can't think of what it's called now), was sitting on my kitchen counter. To do the bottom couple of layers, I had to squat down to be at the right level. People... it took me probably 3 hours to decorate this cake. That's THREE HOURS OF SQUATS! My quads are killing me! And also, the longer I worked, the softer and mushier the icing got, which meant that it started smearing into each other more. Again, the offset spatulas instead of the spoons would've helped with that.
Despite the challenges, I persevered. Now to be honest, if I had done a better job frosting the top smoothly, I may just stopped on the sides and called it a day, but since I didn't, I needed to keep going and do the top, too.

Eventually, through nothing but pure determination, I finished. I'm pretty sure choirs of angels started singing "Hallelujah" and I may have collapsed on the floor in tears of joy. Maybe...


The only thing that was left was to make some kind of topper to go on top. At first I was going to make white blocks that spelled out "Jump" (A's special nickname), but after seeing the cake, I thought I needed to come up with something else.
Flash back to one of my favorite decorating techniques, which is using candy melts to make personalized decorations for cakes/cupcakes. So I wrote out JUMP on a piece of paper and then put that under a piece of wax paper. This was mostly just to make sure the size of the letters was fairly even.

Then I followed the directions to melt the chocolate and quickly put it into a piping bag with a number 3 tip. I loosely followed the guide I made and wrote out jump on the wax paper. This is a really fun technique and you can do a ton with it, but you do have to work fast when working with the candy melts. They harden fairly quickly! For more ideas, visit the Bird on a Cake blog for more fun ideas of how to use melted chocolate for fun decorating ideas! (And also, I don't know why this picture is sideways, but it doesn't seem to want to rotate, so I'm just going with it!)

Then, to make it colorful to go with the cake, I just dumped a ton of sprinkles on top to make sure the letters were well-covered.

I stuck all that in the freezer for about 20 minutes, and then pulled it out and shook off the letters, and there you go - ready to stick right on top of the cake!


I didn't get a picture of the inside of the cake after it was cut, but thankfully A's mom is a photographer and it's well-documented. I'll add more of the professional quality photos once she has a chance to go through them.
Overall, I would try this kind of technique again. I would definitely do it on a smaller cake, though - 8" or less. And I would also use an offset spatula to draw out the frosting instead of the back of the spoon. Also, if you want to try this for a first time, I would stick to just using one color on the first attempt. It's not a hard process, but the time increased significantly because I was constantly changing out piping bags and spoons. Keep in mind that even though this was my first time doing this type of technique, I am pretty well-versed at using buttercream in other ways, so I would say my skill level is probably intermediate (at least in novice terms). I would like to work on getting the petals a little smoother, though, so I'll have to find other opportunities to practice!
What do you think? Ready to try this yourself??? :)